
To check activity history on Windows 10, open the Task View option in the taskbar. From there, you can see your recent activities.
Windows 10 has a feature that allows users to keep track of their activity history. This feature is useful for those who want to monitor their productivity or for those who want to keep track of recent activities for later reference.
By following simple steps, you can easily check your activity history on Windows 10. we will explain how you can find your activity history and how you can manage your recent activities. Whether you are a student, a professional, or a casual user, knowing how to access and manage your activity history on Windows 10 can help you stay organized and efficient.

Credit: akfash.wordpress.com
Why Check Activity History On Windows 10?
Checking activity history on Windows 10 is essential for users who want to track their app usage and monitor system changes. By checking the activity history, users can see which apps were used at what time, how much time was spent on each app, and how many times the app was launched. This helps users identify any unwanted or unnecessary apps that are taking up valuable system resources and can be removed to free up space. Additionally, by monitoring system changes, users can keep track of any modifications made to their system settings and configurations.
Apart from being a useful tool for personal users, checking activity history is also helpful for businesses and organizations. It can be used to monitor employee activity and ensure that they are using company resources efficiently. Furthermore, it can be used to identify any security threats or suspicious activity and take appropriate action. Overall, checking activity history on Windows 10 is an easy and effective way to maintain system health and optimize performance.
| Benefits of Checking Activity History |
|---|
| Track app usage and identify unnecessary or unwanted apps. |
| Monitor system changes and keep track of any modifications made to settings and configurations. |
| Useful tool for businesses and organizations to monitor employee activity and identify security threats or suspicious activity. |
Credit: www.thewindowsclub.com
Accessing The Activity History
To access the activity history on Windows 10, there are two ways to do it. One is by using the Task Manager, and the other is by viewing it through the Settings App.
To check your activity history using the Task Manager, right-click on the taskbar and select “Task Manager” or use the keyboard shortcut “Ctrl + Shift + Esc”. Click on the “More Details” button, go to the “App history” tab and view your activity history under the “Usage statistics” section.
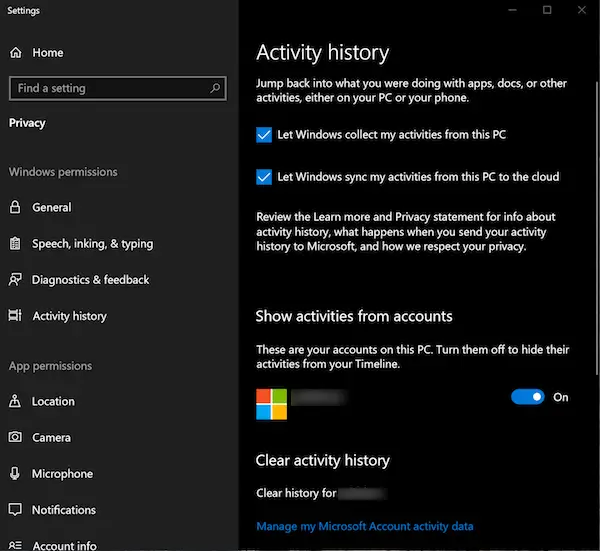
Another way to access the activity history is through the Settings App. Click on the “Start” menu, select “Settings”, and then click on “Privacy”. Scroll down and click on “Activity history”. Here, you can view your activity history including your recently opened apps and files, as well as your past activity on Microsoft Edge browser.
Checking your activity history on Windows 10 is simple and easy. You can access it through the Task Manager or through the Settings App. Keep track of your usage statistics, recently opened apps and files, and past activity on Microsoft Edge for a more organized and efficient workflow.
Interpreting The Activity History
To check your activity history on Windows 10, you need to interpret the Activity History, which consists of information on applications, processes, and background processes.
The Applications section shows the name of the application, date and time it was last used, and the duration of usage.
The Processes section shows information on processes running on your computer, including its name, how much CPU and memory it has consumed, and the start time.
The Background Processes section shows processes that run in the background, and its details are similar to processes in the Processes section.
You can use this information to identify which applications or processes are slowing down your computer or causing any issues. Knowing how to access and interpret the Activity History on Windows 10 will help you optimize your computer’s performance and productivity.
Filtering And Exporting Activity History Data
Windows 10 has a built-in feature that allows you to review your activity history, such as the apps and services you’ve used. You can filter the information by date, app, or resource usage to help you find what you’re looking for quickly. To do this, go to Start and then go to Settings. Click on the Privacy option and select Activity history. You can select the data you want to filter and sort.
You can also export the activity history data to a CSV file. This allows you to analyze the information on a different device or in a different application. To export the data, select the Manage my Microsoft account link and sign in. Then, select the Download your data option and choose the data types you want to export.
| Steps | What to do |
|---|---|
| Step 1 | Go to Start and click Settings |
| Step 2 | Select Privacy and then Activity history |
| Step 3 | Select the data you want to filter and sort by date, app, or resource usage |
| Step 4 | To export activity history data, select Manage my Microsoft account |
| Step 5 | Select Download your data |
| Step 6 | Choose the data types you want to export and download as CSV file |
Related Privacy Concerns
To check your activity history on Windows 10, follow these simple steps. Firstly, Press the Start Button and then select the Settings gear icon. Now, select Privacy from the list of options, and then scroll down to the Activity History section. Here you will be able to view all of your recently opened files and visited websites.
| Related Privacy Concerns: | |
|---|---|
| To turn off activity tracking: | Click on the Clear button (which you will find under the Activity history section in privacy settings) to delete all existing activity. |
| To delete activity history data: | Select the Manage my Microsoft Account option and sign in to your Microsoft account. This takes you to your Microsoft Privacy Dashboard, where you can select the ‘Activity History’ tab and delete specific activity data according to date and type. |
It’s important to note that turning off activity tracking will reduce the personalized experience you get on Windows 10. However, this is a great option for anyone who is concerned about their privacy and does not want their activity data to be stored. Remember, it’s always a good idea to be aware of what data your computer is collecting and take necessary steps to protect your privacy.
Best Practices For Staying Informed
To check your activity history on Windows 10, go to the Start menu and select Settings. From there, click on Privacy and then select Activity history. This will show you all recent activity on your device, including searches and app usage.
Best Practices for Staying Informed: Regularly checking your activity history on Windows 10 can help you monitor your device’s usage and stay updated on any actions taken on it. To do so, follow these simple steps: – Open the “Settings” app – Click on “Privacy” – Select “Activity history” – Here, you can view a detailed history of your device’s activity, including recent documents, apps and websites accessed, and Cortana interactions. Additionally, adjusting your notification settings can help you stay informed of any important updates or changes on your device. Simply go to “Settings”, click on “System”, and select “Notifications & actions”. From here, you can customize which notifications you receive and how they are displayed. By regularly checking your activity history and adjusting notifications to your needs, you can ensure that your device is functioning optimally and stay informed of any important updates or changes.
Credit: www.wikihow.com
Frequently Asked Questions On How Do I Check My Activity History On Windows 10
How Do I Check Recent Activity On My Computer?
To check recent activity on your computer, go to the Windows Event Viewer or Mac’s Console app. These tools display logs of recent actions, error messages, and system events. You can track user logins, program installations, and software updates in the logs.
Where Is The Activity History In Windows 10?
The activity history in Windows 10 can be found in the Timeline feature. Click the Task View button on the taskbar or press Windows Key + Tab to access it. You can also use the shortcut Windows Key + Tab + Ctrl.
How Do I Check My Computer History?
To check your computer history, you can follow these simple steps: Open your browser, click on the History tab, and you’ll see a list of websites you’ve visited. You can also use keyboard shortcuts like “Ctrl + H” or “Cmd + H” in the browser to directly access your browsing history.
How Do I Monitor User Activity In Windows 10?
To monitor user activity in Windows 10, use the built-in Event Viewer tool. Open it by typing “event viewer” in the search bar, click on “Windows Logs” in the left panel, then select “Security. ” Here you can view user logins, logouts, failed attempts, and more.
Conclusion
To sum up, checking your activity history on Windows 10 can be done in a few simple steps. It’s an excellent way to keep track of what you’ve been up to on your computer, especially when it comes to troubleshooting issues.
The built-in feature is easy to use, and you can access it quickly by following our guide. Keeping your activity history organized will help you work more effectively and maximize your productivity.