
To install Ethernet drivers on Windows 10 without internet, you need to download the drivers on another device and transfer them using a USB drive. Then, use Device Manager to install the drivers.
Installing Ethernet drivers on Windows 10 without internet can be challenging if you do not know how to go about it. Ethernet drivers are essential for connecting to the internet and getting updates for your computer. If your computer does not have an internet connection, you need to download the Ethernet drivers on another computer with internet access and transfer them to your device.
We will discuss how to install Ethernet drivers on Windows 10 without internet, step-by-step.
Why Ethernet Drivers Are Required For Windows 10
Windows 10 requires proper installation of Ethernet drivers in order to run optimally. These drivers facilitate communication between the device and network adapter, without which internet connectivity is impossible. Ethernet drivers are essential for establishing a smooth internet connection, ensuring efficient data transfer rates, and enhancing the overall user experience.
The importance of Ethernet drivers cannot be overstated. Without them, the device will be unable to connect to the internet and obtain software updates, which can lead to security vulnerabilities and software malfunction. Failing to install Ethernet drivers can cause a plethora of problems, such as dropped connections, slow internet speeds, and even complete loss of network functionality.
It is highly recommended to install Ethernet drivers before connecting to the internet, to avoid any issues that may arise from missing drivers. In case you do not have access to the internet, you can install the required drivers offline using external media such as a USB drive. Once installed, your Windows 10 device will be able to connect to the internet smoothly without any issues.

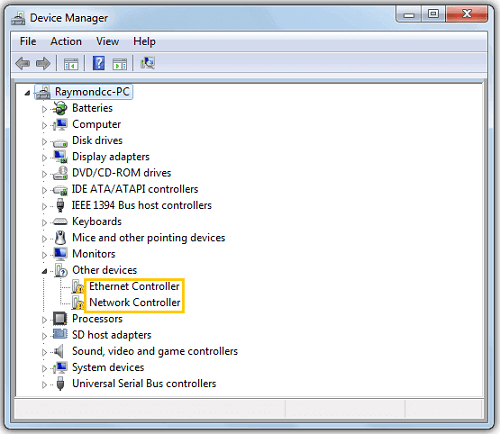
Credit: askubuntu.com
Checking For Ethernet Driver Availability
Installing Ethernet drivers on Windows 10 without an internet connection can be a challenging task. To locate the required drivers, you should check the device manager first. Open the device manager, click on ‘Network adapters’, and check if the Ethernet driver is installed. If it is not installed, you can locate the driver by checking the device manufacturer’s website. You can search for the specific Ethernet driver using the device model number or the operating system version. Once you find the driver, download it and install it on your device. You can also use a USB flash drive to transfer the downloaded driver to your device if you don’t have an internet connection.
| Steps to Install Ethernet Drivers on Windows 10 |
|---|
| Step 1: Open Device Manager and locate Network Adapters |
| Step 2: Check for installed Ethernet drivers |
| Step 3: If the driver is not installed, go to the device manufacturer’s website |
| Step 4: Search for the Ethernet driver using the device model number or the operating system version |
| Step 5: Download the driver to a USB flash drive or your device |
| Step 6: Install the driver on your device by following the on-screen instructions |
Copying Ethernet Drivers For Offline Installation
If you need to install Ethernet drivers on Windows 10 without an internet connection, you can do so by copying the necessary files onto a USB drive. First, make sure you have a USB drive with enough space to store the downloaded driver file. Then, download the appropriate driver from the manufacturer’s website using a different computer with internet access. Once the download is complete, transfer the file to the USB drive. Next, insert the USB drive into the Windows 10 computer and locate the downloaded file. Extract the files from the archive and copy the necessary files to the appropriate location. Finally, restart the computer and the Ethernet drivers should be installed.
Credit: www.fonepaw.com
Manually Installing Ethernet Drivers On Windows 10
Installing Ethernet drivers on Windows 10 can be done manually without internet by accessing the Device Manager. First, navigate to the Device Manager by holding ‘Windows’ and ‘X’ keys and clicking on ‘Device Manager’. Then, locate the Ethernet adapter under ‘Network Adapters’ tab. Right-click on it and select ‘Update driver’. Choose the option ‘Browse my computer for driver software’ and select the location where you have downloaded the driver software. The drivers will be installed automatically.
It is important to have the correct driver software downloaded and saved prior to starting this process. By following these steps, you will have successfully installed the Ethernet drivers on your Windows 10 computer without the need for internet connectivity.
Alternative Methods Of Installing Ethernet Drivers
If you are facing issues with Ethernet drivers on Windows 10, you can use alternative methods to get them installed without an internet connection. A driver update tool such as Driver Talent can detect and install the latest Ethernet drivers automatically. You can download the tool on another computer, save it on a USB drive, and transfer it to your Windows 10 PC. Install the tool, scan for driver updates, and select Ethernet drivers to download and install.
Alternatively, you can manually download Ethernet drivers on another computer and transfer them to your Windows 10 PC. Visit the manufacturer’s website, search for the correct model and operating system, and download the drivers on a USB drive. On your Windows 10 PC, plug in the USB drive and install the drivers by following the prompts. Restart your PC and check if the Ethernet drivers are working.
| Method | Pros | Cons |
|---|---|---|
| Driver update tool | Automatically detects and installs latest drivers. Easy to use. | Requires an additional computer with internet. May need to purchase the tool. |
| Manual download | No need for internet connection. Free. | Requires knowledge of correct driver and operating system. More time-consuming. |
Tips For Successful Ethernet Driver Installation
To ensure the successful installation of Ethernet drivers on Windows 10 without internet, you need to back up your drivers first. It is also important to check compatibility for both your system and the drivers you are about to install. Make sure to verify the authenticity of the driver to avoid any issues.
Backing Up Drivers
Before installing Ethernet drivers, back up your old drivers first. This is important to ensure that you have a backup in case something goes wrong during the installation. You can use third-party software to back up your drivers or you can do it manually by copying the drivers to an external hard drive.
Checking Compatibility
Checking compatibility for both your system and the drivers you are about to install is crucial. Make sure to download the correct driver for your system and version of Windows 10. Check the hardware requirements for the driver to ensure that it will work on your system.
Verifying The Driver’s Authenticity
Always verify the authenticity of the driver before installing it. You can do this by checking the vendor’s website or contacting their customer support. Make sure to download the driver from a reputable source to avoid downloading malware or viruses.
Common Problems And Solutions For Ethernet Driver Installation
Installing Ethernet drivers on Windows 10 can be a daunting task, especially when you don’t have an internet connection. Some common issues that users face during the installation process include Driver Compatibility Issues, Incorrect Driver Installation, and Driver Update Failures. To avoid compatibility issues, always ensure that the driver you download is compatible with your system. Driver installation errors can often be resolved by simply downloading the driver from the manufacturer’s website and following the instructions carefully. In case of driver update failures, try installing the driver manually from the Device Manager. These simple solutions can help you install Ethernet drivers on your Windows 10 system without an internet connection.

Credit: www.drivereasy.com
Frequently Asked Questions Of How Do I Install Ethernet Drivers On Windows 10 Without Internet
How Do I Manually Install Ethernet Drivers Windows 10?
Manually installing Ethernet drivers in Windows 10 involves three steps. Firstly, search for the driver on the manufacturer’s website. Secondly, download and extract the driver to a folder. Thirdly, open Device Manager, right-click on the Ethernet driver, select “Update driver,” and browse to the extracted folder to install the driver.
How Do I Update Windows Drivers Offline?
To update Windows drivers offline, you can download the driver installer from the manufacturer’s website and transfer it to the computer with the unsupported device. Once you run the installer, the new drivers will be installed. Alternatively, you can use a driver updater tool that can scan and update your drivers offline.
Do You Need To Download Ethernet Drivers?
Yes, you may need to download Ethernet drivers if your computer or device doesn’t automatically detect or install them. This is especially true if you are using a new or custom-built computer, or if you have recently updated your operating system.
It is recommended to visit the manufacturer’s website to download the drivers for your specific network adapter.
How Do I Download Network Drivers?
To download network drivers, go to your computer or device manufacturer’s website and locate the support or download section. From there, select your product model and operating system, then download the correct network driver. You can also use third-party driver update software to automatically locate and install the latest drivers.
Conclusion
Therefore, installing Ethernet drivers on Windows 10 without the internet is not as difficult as it may seem. By following the methods mentioned above, you can easily download and install the required drivers on your computer. With a little bit of patience and careful execution, you can be up and running in no time.
Remember to follow the steps carefully and choose the appropriate method according to your needs. Don’t forget to update your drivers regularly to ensure the smooth running of your system.