
To open Devices and Printers in Windows 10, click on the Start menu and type “Devices and Printers” in the search bar. Devices and Printers in Windows 10 is a shortcut to managing and viewing all the devices and printers connected to the computer.
It’s a convenient way to see the status of hardware, troubleshoot connectivity issues, manage and configure devices, and print documents and images. We explore various ways to access Devices and Printers in Windows 10, including through the Start menu, Control Panel, and Run command.
We explore the functionalities of the Devices and Printers window, including advanced printer settings, troubleshoot options, and device properties. We also provide tips and solutions to common device and printer problems to make your experience with Devices and Printers even smoother.
Credit: www.sweetwater.com
Accessing Devices And Printers
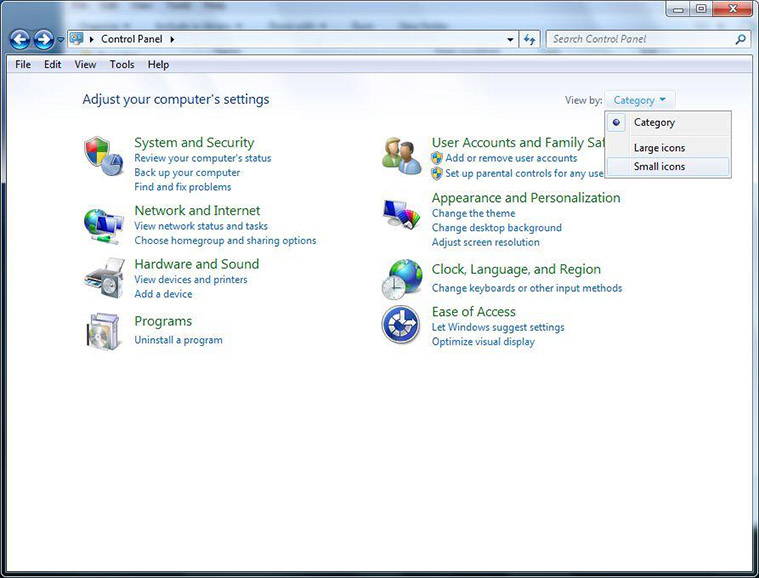
To access Devices and Printers in Windows 10, users can utilize two options. The first option is by using the Control Panel. Simply click on the Start menu and search for Control Panel. Once selected, find the Devices and Printers option and click on it to open.
The second option is by using Windows Search. Click on the Start menu, and type in “Devices and Printers” in the search bar. Select the option to open Devices and Printers. Users can also access Devices and Printers by right-clicking on the Windows icon, located at the bottom left of the screen. A pop-up menu will appear, with the option to open Devices and Printers.
Once Devices and Printers are accessed, users can manage and view all devices connected to their computer. They can also add new devices, troubleshoot any issues, or adjust settings for printers and other connected devices.
Navigating The Devices And Printers Window
To open Devices and Printers in Windows 10, first click on the Start menu and select Settings. Next, select Devices followed by Printers and Scanners. Finally, click on the Devices and Printers link at the bottom of the page to navigate the window.
In Windows 10, the Devices and Printers window provides a quick way to access all the external devices that are connected to your computer. To open the Devices and Printers window, simply right-click on the Start menu and select “Device Manager” from the list of options. Once the Device Manager opens, you’ll see a list of all the devices connected to your computer. In the “Devices” section of the window, you’ll see a list of all the external devices connected to your computer, such as USB drives, external hard drives, and cameras. You can also view information about each device, including the name, manufacturer, and driver details. In the “Printers” section of the window, you’ll see a list of all the printers that are installed on your computer. You can also view information about each printer, including the name, status, and whether it’s set as the default printer. From this window, you can also set a default printer, troubleshoot printing issues, and add new printers to your computer.Managing Devices
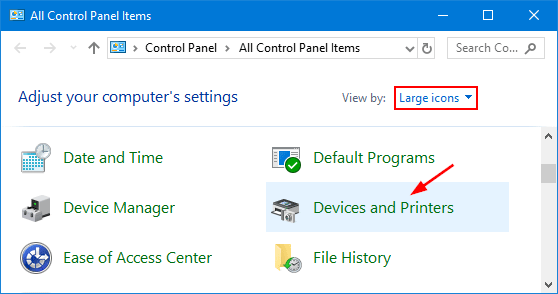
To access Devices and Printers on Windows 10, type “Control Panel” in the search bar, select “View Devices and Printers”. From here you can manage connected devices, printers, and troubleshoot issues that may arise.
To view details of the devices connected to your Windows 10 PC, you can open the Devices and Printers feature. This feature allows you to manage your devices and troubleshoot issues related to them. To access Devices and Printers, you can type “devices and printers” in the search box in the Start menu or in the Control Panel. Once you open Devices and Printers, you can see a list of devices connected to your computer. To view device details, simply right-click on any device and select Properties. Here, you can see information about the device, such as device status, manufacturer, driver information, and more. To update driver software or uninstall a device, you can right-click on the device and select the corresponding option. With Devices and Printers, managing your devices has never been easier.Managing Printers
Opening Devices and Printers in Windows 10 allows you to manage printers connected to your device. Adding a printer is easy, simply click on “Add a Printer” and follow the prompts. You can also set a default printer for your device by right-clicking on the desired printer and selecting “Set as Default Printer”. If you need to remove a printer, right-click on the printer and select “Remove Device”. Keep in mind that you will need administrative privileges to make changes to printers.
Troubleshooting Devices And Printers
Having trouble with your Devices and Printers in Windows 10? A common issue you might face is hardware changes. To troubleshoot, first, locate Devices and Printers from the Control Panel. Then, check for hardware changes by clicking on the option in the toolbar at the top. If that doesn’t work, try running the Printer Troubleshooter by right-clicking on the problematic printer and selecting “Troubleshoot”. This will diagnose and potentially fix any issues automatically.
Credit: www.top-password.com
Credit: www.yumpu.com
Frequently Asked Questions On How Do I Open Devices And Printers In Windows 10
What Is The Shortcut To Open Devices And Printers?
The shortcut to open devices and printers in Windows is through the Control Panel. You can press the Windows key + R, type “control printers” and press enter, or open the Control Panel and click on “Devices and Printers”.
What Is The Shortcut For Printers And Devices In Windows 10?
The shortcut for Printers and devices in Windows 10 is “Windows key + I” to open the Settings app, then click on “Devices” and select “Printers & scanners” from the left-hand menu.
How Do I Find Printers And Scanners In Windows 10?
To find printers and scanners in Windows 10, click the Start menu, go to Settings, then Devices and Printers. Here, you can add or remove devices and choose your default printer. You can also troubleshoot any issues with printing or scanning devices from this menu.
Where Is The Printers And Scanners Menu?
The Printers and Scanners menu can be found in the Control Panel on a Windows computer. To access it, go to the Start menu, select Control Panel, and then choose Devices and Printers. Here, you will see a list of all connected printers and scanners and can manage their settings.
Conclusion
Opening Devices and Printers in Windows 10 is a simple task that can be done in various ways. You can use the Start Menu, Control Panel, or even create a shortcut on your desktop. It is a useful tool to manage your connected devices and printers easily.
By following the steps mentioned in this post, you can quickly access Devices and Printers on your Windows 10 PC.