
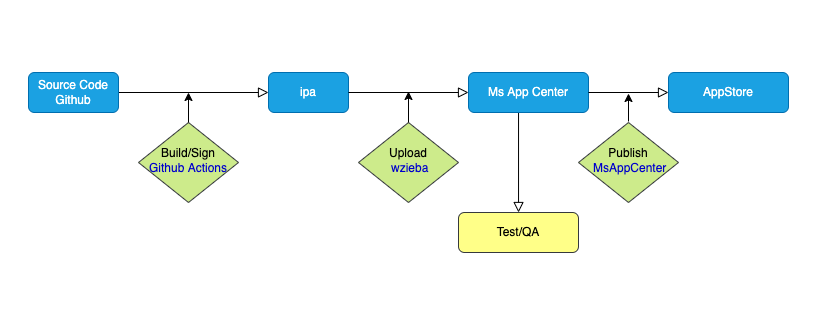
To build an IPA application for React Native iOS, use Xcode to generate an archive. Then, distribute the archive through the App Store or through ad-hoc distribution.
Creating an IPA file for your React Native iOS application can seem challenging at first, but it’s crucial for testing your app on a physical device and for sharing it with others. We will discuss the steps involved in building an IPA file for your React Native iOS application.
By following these steps, you’ll have a fully functional IPA file that can be distributed to your team or uploaded to the App Store. We’ll cover everything from generating an archive to using ad-hoc distribution and show you how to properly configure your app for distribution. Let’s dive in!
Setting Up Development Environment
To build an IPA application for React Native iOS, we need to set up our development environment. Here are the steps to set up the development environment.
Installing Xcode
Xcode is the official IDE for all Apple products, and we need to install it to build iOS applications. To install Xcode, we can either download it from the App Store or download it from the Apple Developer website.
Installing Node.js And Npm
Node.js is a JavaScript runtime that allows us to run JavaScript outside of the web browser. npm is a package manager for Node.js packages. We need to install Node.js and npm to use React Native CLI. To install Node.js and npm, download the installer from the Node.js website and follow the installation process.
Installing React Native Cli
To build and run a React Native iOS application, we need to install the React Native CLI. To install React Native CLI, open a terminal window, and run the following command:
Once the installation is complete, we can create a new React Native project by running the following command:
By following these steps, we can set up our development environment to build an IPA application for React Native iOS.

Credit: blog.codemagic.io
Creating A New React Native Project
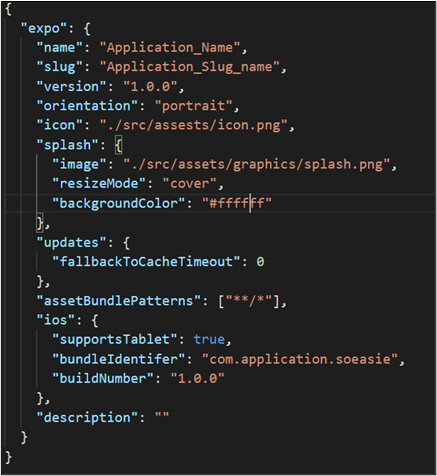
To build an IPA application for React Native IOS, you need to create a new React Native project first. Follow the steps given in the React Native documentation and install necessary dependencies such as Xcode and command-line tools. Once the project is created, use Xcode to build and export the IPA file for distribution.
Adding Dependencies To The Project
To build an iOS app using React Native, it is necessary to add some dependencies to the project. First, we need to install CocoaPods on our system using the terminal with the command sudo gem install cocoapods. Once installed, we need to create a new file named Podfile in the project root directory and add the required dependencies such as React, React Native, and Yoga. We can also add third-party dependencies using the pod command. After configuring the Podfile, we need to run the command pod install to download and install the dependencies in our project. Finally, we need to open the project using the .xcworkspace file instead of the .xcodeproj file to ensure that the dependencies are correctly linked to the project.
Preparing The Ios Environment
To build an iOS app using React Native, the first step is to prepare the environment for it. This involves setting up Xcode, installing necessary dependencies, and configuring the development environment. Once this is done, you can proceed to build and test your IPA application.
To build an iOS app using React Native, you need to set up your development environment on your Mac machine. To start with, you have to create an Apple Developer account. Doing so will grant you access to all the tools required for building iOS apps, including Xcode and the iOS SDK.
| Creating an Apple Developer Account |
| Go to the Apple Developer website and sign up for an account. It requires payment of the yearly fee. |
| Setting up certificates and profiles |
| Certificates and profiles are required to sign, build, and distribute your iOS app. You can create them by logging into your Apple Developer account, choosing the Certificates, IDs & Profiles section, and following the instructions. |
| Configuring Xcode for iOS development |
| Xcode is the Integrated Development Environment (IDE) used to develop iOS applications. Once you have registered as an Apple Developer, download and install Xcode from the App Store. After installation, you need to configure Xcode for iOS development by choosing the right team and signing certificates. |
Building The Ios App
To build an IPA application for React Native iOS, you’ll first need to set up Xcode and configure your environment. Then, create a new project in Xcode and install the necessary packages for React Native. Finally, run your app in Xcode to generate the IPA file for distribution.
To build an IPA application for React Native iOS, you must first link all dependencies. This can be done by running react-native link in the command line for each package or manually linking them in Xcode. Once dependencies are linked, the app can be built using Xcode through the Product menu and selecting Build. After the build is complete, the app can be run on a simulator or device by selecting the corresponding option under the Product menu. Running on a device requires a provisioning profile and a valid certificate. Make sure to test the app thoroughly before submitting it to the App Store for review.
Credit: medium.com
Testing And Debugging
To ensure a successful build of an IPA application for React Native iOS, testing and debugging are crucial steps. Developers should use tools such as Xcode’s simulator and device testing to identify and fix errors, ultimately improving the app’s performance and user experience.
To ensure optimal performance of an IPA application built with React Native iOS, testing and debugging of the app are crucial. Debugging the app using Xcode is a common way to troubleshoot and resolve any issues. Running unit tests and integration tests are also important steps in verifying the functionality of the app. Additionally, testing the app with a physical device is recommended, as it provides a more accurate reflection of how the app would behave in real-life scenarios.
| Debugging | Testing |
|---|---|
| Use Xcode to troubleshoot and resolve issues | Run unit and integration tests to verify functionality |
| Inspect code and check for errors | Test the app with a physical device for accuracy |
| Utilize breakpoints to pause execution and examine variables | Simulate various real-life scenarios and user interactions |
Submitting The App To The App Store
Before submitting an IPA application to the App Store, developers must go through several steps to ensure their application is functional, complete, and ready to be released. Preparing the app for submission involves testing the software on a variety of devices to identify and fix bugs or glitches. Developers must then create an app listing, providing an accurate description of the application along with screenshots of the software. Once the app is ready for submission, developers must upload the IPA file to the App Store and submit it for review. Apple’s review process can take several days or even weeks, so app developers should anticipate this and plan accordingly. Once the app has been approved by Apple, it can be released to the public and made available for download through the App Store.
Credit: www.soeasie.com
Conclusion
Building an IPA application for React Native iOS is not as challenging as it sounds. By following the guidelines outlined in this blog post and utilizing the resources available, you can build your own application with ease. Remember to focus on excellent user experience, including fast speeds and a seamless interface.
Keep it simple, keep it stable, and keep iterating until it’s perfect. Finally, don’t forget to test your app before submitting it to the App Store. Follow these steps, and you’re well on your way to success.