
To add custom fonts in React Native iOS, you need to link the fonts with Xcode and add them in the info.plist file. React Native iOS allows you to add custom fonts to your project.
Custom fonts can be used for better design, branding, or to match the project requirements. Adding custom fonts to React Native iOS is a quick and easy process, and it requires linking the fonts with Xcode and adding them in the info.
plist file. This article will guide you through the steps required to add custom fonts to React Native iOS. So, let’s get started!
Credit: kswanie21.medium.com
Choosing The Custom Font
When it comes to choosing a custom font for your React Native IOS app, there are a few things to keep in mind. Firstly, check the font license to make sure it can be used commercially. Next, download the font and save it in a folder within your project directory.
To add the font to your project, you’ll need to link the font in your App.js file. You can do this by importing the font file and then adding it to the Font.loadAsync method. Once you’ve done this, you can use the font by specifying its name in your styles.
It’s important to note that custom fonts can increase the size of your app, which can affect its performance. To minimize the impact, it’s a good idea to only use custom fonts where necessary and to compress the font files as much as possible before including them in your project.
| Step | Description |
|---|---|
| 1 | Check the font license to ensure it can be used commercially |
| 2 | Download and save the font in a folder within your project directory |
| 3 | Link the font in your App.js file using Font.loadAsync method |
| 4 | Specify the font name in your styles to use the font |
| 5 | Compress the font files to minimize the app size |

Credit: www.youtube.com
Linking Native Modules
Linking Native Modules in React Native IOS is essential to add custom fonts. Here’s how:
Linking for IOS:
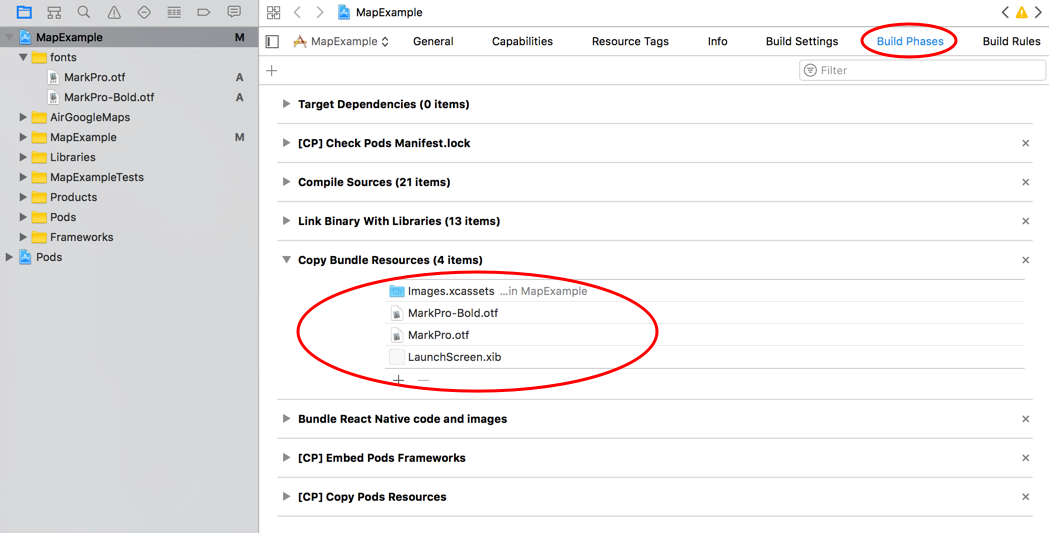
- Create a new font target in Xcode
- Add font files to the target using “Copy Bundle Resources” build phase
- Retrieve the font file path in React Native by using Native Modules and DispatchQueue
- Link the retrieved font file path to the Text component using the “fontFamily” prop
Linking for Android:
- Create a new directory under the “assets” folder and copy the font file into it
- Create a custom font family XML file under the “res/font” folder and reference the font file path inside it
- Retrieve the font family in React Native by using Native Modules and DispatchQueue
- Link the retrieved font family to the Text component using the “fontFamily” prop
By following these steps, you can add custom fonts to your React Native IOS project and improve the visual aesthetics of your app.
Usage Of Custom Font In React Native
Custom fonts can help you give your React Native IOS app a unique look and feel. Importing the font is the first step of incorporating it into your application. You can do so by adding the font files to the assets folder of your project and modifying the Info.plist file. To use the custom font in styling, you need to define the font family and weight in your stylesheet. With the help of fontFamily property you can apply the font to the desired text. Once the font has been added and applied, you can preview it in an emulator or on a device. That’s it! You’ve successfully added a custom font to your React Native IOS app.
Testing The Custom Font
To test the custom font on the IOS Simulator, open the Xcode project and run the app. Make sure that the font is loaded correctly and is displayed on the screen. You can also test the font on an IOS device by compiling and running the app on the device.
If you encounter any font issues, double-check the font file and make sure it is correctly referenced in the project. Check the file name and case sensitivity if the font is not loading. Also, ensure that the font file is added to the project and included in the app bundle.
Once the font is loaded and working correctly, you can use it in your project as desired. Remember to properly credit the font designer and follow any licensing requirements before using the custom font.

Credit: github.com
Conclusion
Now that you know how to add custom fonts in React Native iOS, you can enhance the visual appeal of your app by giving it a unique feel. Adding custom fonts is a simple process that can transform the look and feel of your app.
With the right set of tools and resources, you can make your app stand out from the crowd. Ultimately, this will attract more users and improve your overall success. So, what are you waiting for? Start experimenting with custom fonts today!