To change your C user name in Windows 10 Home, go to your account settings and create a new local account with the desired name, then transfer all data from the old account to the new one. Changing your user name in Windows 10 Home may seem like a daunting task, but it is a relatively simple process.
Your user name is the name that appears on the login screen and in the file path for your C drive. If you want to change it, the best way is to create a new local account with the desired name, transfer the data from your old account to the new one, and delete the old account.
We will guide you through the step-by-step process of changing your C user name in Windows 10 Home.
Why Change The User Name?
Changing your user name can be necessary for a variety of reasons. Firstly, if your current user name is too complex, it may be difficult to remember. Secondly, if multiple people use the same system, a unique user name can help differentiate between different users. Finally, if you have recently changed your name or username on other platforms, then changing it on your Windows 10 system can help maintain consistency.
Benefits Of Changing User Name
- A new user name makes it easy to remember for the user.
- Helps in keeping personalized identity.
- Also helps in managing multiple user accounts in the same system.
When To Change User Name
If your current user name is difficult to remember or causes confusion when multiple users use the same system, then it’s time to change it. Additionally, if you recently changed your name or username on other platforms, it’s a good idea to update it on your Windows 10 system too.
Credit: www.geeksforgeeks.org
Steps To Change User Name
To change the C users name in Windows 10 Home, follow these easy steps:
- Create a new user account with the desired name.
- Transfer all the necessary files to the new user account, including documents, music, pictures, and downloads. Note: Ensure you have permissions to the files before transferring them.
- Delete the old user account from the computer. Note: Make sure to back up all necessary files and data before doing this step.
- Rename the computer if desired. Note: This step is optional but can be done by right-clicking on the This PC icon, selecting Properties, clicking on the Change settings button, selecting the Change option under the computer name section, and finally typing in the new computer name.
By following these steps, you can easily change the C user name in Windows 10 home and keep your files organized under the new user account.
Important Points To Consider
To change your Windows 10 Home C user name, start with backing up all your important files. This is important in case something goes wrong during the process. Once you have done that, restart your computer and log in with an account that has administrator rights. Next, open the Control Panel and select “User Accounts”. Click on “User Accounts” again and select “Change your account name”. Enter a new name you want to replace your existing one with and click “Change Name”. You will be prompted to restart your computer for the changes to take effect. Finally, update your new user name in all the apps you use regularly. It’s important to note that changing your user name won’t affect your files, folders, or personal data.
| Steps to change C user name in Windows 10 Home: |
|---|
| Back up your files. |
| Restart your computer. |
| Open Control Panel and select “User Accounts”>“User Accounts”>“Change your account name”. |
| Enter your new user name and click “Change Name”. |
| Restart your computer to apply the changes. |
| Update your new user name in all the apps you use regularly. |
:max_bytes(150000):strip_icc()/005-how-to-change-the-user-folder-name-in-windows-10-c44a88f2c9874ac7afb7d8ac83483e19.jpg)
Credit: www.lifewire.com
Credit: reachmnadeem.wordpress.com
Frequently Asked Questions On How Do I Change My C Users Name In Windows 10 Home
Can You Rename C Users?
No, you cannot rename the C Users folder in Windows as it is a crucial system folder. Doing so may lead to system instability, data loss, or other issues. It’s best to leave it as is and create new user accounts instead if needed.
How Do I Change My C Name In Windows 10?
To change your C-name in Windows 10, navigate to the System Properties menu from the Control Panel, click the Change Settings option, and click the Change button next to “To rename this computer or change its domain or workgroup, click Change.
” Then, enter the desired computer name and click OK to apply the changes.
How Do You Rename A User In Windows 10 Home?
To rename a user in Windows 10 home, click on the start menu and select “Settings”. From there, go to “Accounts” and select “Family and other people”. Click on the user you want to rename and select “More options”. Then, click on “Edit name” and enter the new name.
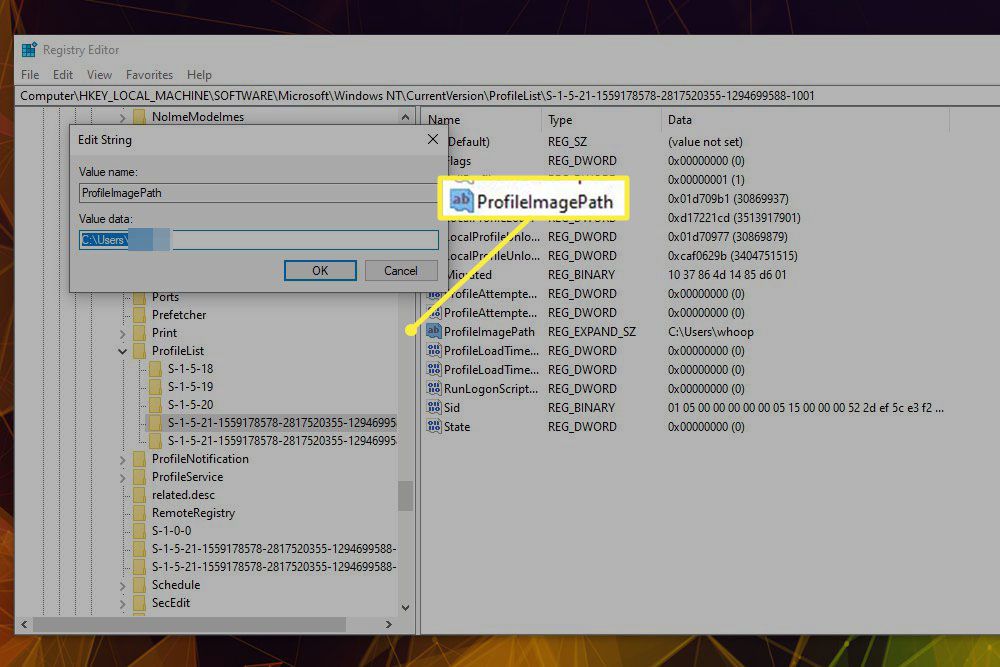
How Do I Change My C User Username In Windows 10 Registry?
To change your C user username in Windows 10 registry, follow these steps: Press Win+R key, type “regedit” in the Run dialog box and press Enter. Navigate to HKEY_LOCAL_MACHINE\SOFTWARE\Microsoft\Windows NT\CurrentVersion\ProfileList. Find the profile you want to rename and change the “ProfileImagePath” value to the new username.
Conclusion
Changing your C Users Name in Windows 10 Home may seem like a daunting task, but it is a relatively easy process that can be done in a few simple steps. The first step is to create a new user account with the desired name and move all your data to the new account.
Then, you can delete the old user account and rename the new account to the old name. By following these steps, you can easily change your C Users Name and enjoy a personalized user experience on your Windows 10 Home PC.